
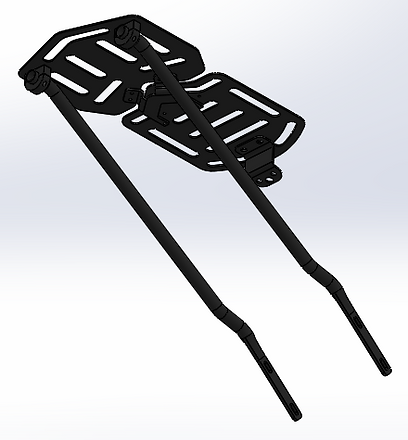
Ninja 300 Luggage Rack
The motivation of this project was to serve the local Bay Area community, in which motorcycles are widely used. My team and I intended to maximize load capacity, while minimizing material cost, and maintaining an attractive aesthetic. The entire design costs $47 per unit of production, and can sustain over 500 pounds of applied load. The two rack plates were made from 6061 Aluminum, and the bar supports were made from AISI 9255 Steel.
Our design stands out because the front plate, that overhangs the bike seat, is completely modular. This means that the plate takes the place of the back seat of the bike. The rider is free to attach it based on their conveniences.
This is my biggest project yet, and it took over 8 months to finish. I picked up a great number of skills along the way:
3D Modeling / CAD
GD&T and FEA
Prototype machining
Functional and Crush testing
Project Phases
CAD Model
The model was designed via Solidworks. This is the rear / bottom view. There are only three main subsystems that exist. First is the rack plate towards the rear, which is the only indispensable component. Second are the bar supports, which are only necessary to add load capacity to the rack. Third is the alternate rack plate, which is used as a modular component.
FEA Simulation
Prior to hands-on testing, we needed to assure that our design was feasible enough to meet our goals. This analysis simulates static load of over both rack plates. Most of the impact translates to the support bars, and not so much to the plates. That means that the bars are undergoing severe shear and bending stress.

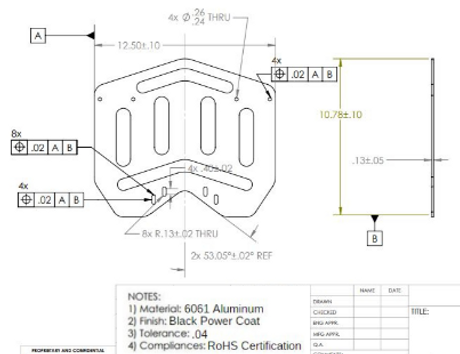
Detailed Drawing
In order to effectively manufacture a prototype, we needed to specify all the dimensions of each component. We learned how to apply GD&T to our project. The positions and tolerances of the bolt holes were crucial for our prototype to succeed. All of our drawings use the ASME Y14.5 standard.
Prototype Machining
Our team had the chance to get in the machine shop and utilize power tools to design each component. As seen here, we used a milling machine to cut our aluminum rack plate to its specified shape.


Prototype Testing
After machining our first prototype, we decided to conduct a basic test for its strength. We incrementally added load onto the rack, from 10 pounds to 36 pounds. As a result, there was minimal deformation of the material. This was good news for us, because our initial goal was 30+ pounds of load.